Category Archives: diy

No Poo: I Broke Up With My Shampoo & Conditioner

Do you remember that post where I talked about coconut oil, baking soda, and how I Broke Up with my Facial Cleanser?  This is the next post in the beauty series of how I broke up with my shampoo and conditioner.  It all began back at Christmas when we made a costly move within England from Brighton to Bath.  Since then I had been trying to stretch out my shampoos to save on product.  It got to be May and I had read a post on my friend Amanda’s blog where she stated I STILL don’t use shampoo.  Back then she had been no poo (shampoo free) for three months. I had heard about this before from my sister and had half attempted it myself.  However, I had not researched how to do it well and had only been using the baking soda. This time I armed myself with the knowledge on Amanda’s blog and after a twitter conversation with her went to the store to get what I needed.  Being in England I ran into some problems as baking soda comes in either small individual packets for baking or a small container.  So if you are attempting this I recommend buying in bulk! I am now four months in and I am not looking to switch back to shampoo.
Things I learned from breaking up with my shampoo and conditioner:
  • The transition period is frustrating. I heard that it would be and I will not lie and say that it is a breeze.  The trick is to keep your hair back and just stick with it.  I ended up going with a french braid and keeping my hair in a plait, instead of wearing it down. It also benefited that I work mostly from home.  If I was working in the salon still, I am not sure how it would have gone down with my coworkers to be honest. Just remember that it is a transition and will not last forever.
  • One size does not fit all.  In this case what may work for one person may not work for you.  This could also apply to your journey with no poo and you may find you have to switch it up a bit.  The tricky part of breaking up with your shampoo and conditioner is to find the right mixture and ingredients for you. I initially started with using the paste method of baking soda because it was what I tried before.  However it was making my scalp very itchy, no matter how well I tried rinsing my my scalp.  I switched it to the baking soda wash method and went from Apple Cider Vinegar (ACV) to White Vinegar (WV).
  • I needed a new brush.  As a hairstylist I have a gazillion brushes but oddly enough did not own an all natural Boar Bristle Brush (BBB).  Since my goal is to grow my hair out long I have been trying to not touch my hair if possible.  That means if I needed to brush my hair I used a wide tooth comb and if I needed to use a comb I tried to just use my fingers.  However I realised from trouble shooting online that I needed to use my BBB.  Ever heard of how women used to brush their hair a hundred times every day?  I use to discredit that and say how horrible that was for your hair as a stylist. Upon research I now actually think it is a good thing. One you need the right kind of a brush.  The natural bristles of a BBB will help distribute the natural oils from your scalp down the hair shaft to make it soft and shiny.
  • I lose a lot of hair every day. This is something I know for a fact. I knew this back when I gave birth to my first son eight years ago.  Along with the knowledge that after you give birth you shed even more hair.  I kid you not, I was still bawling my eyes out in the shower as I saw how much hair I was ‘losing’.  So with not brushing my hair very much I started to freak myself out with seeing all the hair in the brush when I did use it.  However all those hairs that were going to come out anyways have just added up.  I am not going bald, nor is my hair thinning.  I am just overreacting to the number of hairs we can lose every day. If you are wondering that could be up to 130 hairs a day! Wash your hair once a week and do not be sad if you see around 700 hairs coming out in your hands.
  • I need to change things up. At my 3 month mark I noticed my hair was almost reverting back to what it was like during my transition stage.  Except I felt that it was almost worse because I was already three months in.  My hair was not just oily near the scalp, but really sticky.  It also seemed like my BS wash and vinegar rinse were not helping.  After doing some research I tried an egg and honey wash.  I used two egg yolks, 1 tbsp of honey, 1 tbsp of vinegar, and 1/2 tbsp of baking soda. It made a frothy mixture which I rubbed on my scalp for three minutes. I left it on for another five and then rinsed really well. I sprayed my ends with my diluted white vinegar mixture.  I could tell my hair felt better immediately but after my hair dried it was confirmed.  So just know that sometimes you may need to change up your routine.
  • There are many different ways to be ‘no poo’.  You do not have to rely on just baking soda and vinegar. There are so many other ways to go about it and you just have to find what works for you.  I also tried using a mixture of honey and aloe vera fresh from the plant to help when my scalp was itchy from the baking soda paste.  There are so many tea rinses out there that I have been meaning to try out sometime too.
  • I spend less time on my hair. When I was using shampoo (which strips your hair of natural oils, which makes your body then overproduce) I would have to wash my hair every few days.  If I used product or straightened may hair I would have to wash every day.  Now that I can go seven and ten days it has really cut down on how much time I am spending washing my hair.  But it gets better than that! My hair now dries so much faster on its own.  I do not need to be outside in the sun either.  Just being in my house my hair dries on its own in just a few hours.  I have not really timed it, but I know normally my hair would still be quite wet and not fully dry as it is now.  Which means I do not spend tons of time blow drying hair, flat ironing, or using my curling iron.
  • It can work!  Since going about it this time I realised it can work and that has been the best lesson of all.  I can go seven to ten days between washing my hair.  Between that time I will use water only (WO).  Which means yes I still bathe regularly. However I will wear a shower cap to keep my hair out of the way.  Especially if I am going 10 days between my ‘no poo’ wash I will use water only every four or five days.  The trick for me is using hot water and scrubbing my scalp.
————–

HOW I STYLE MY HAIR NATURALLY.
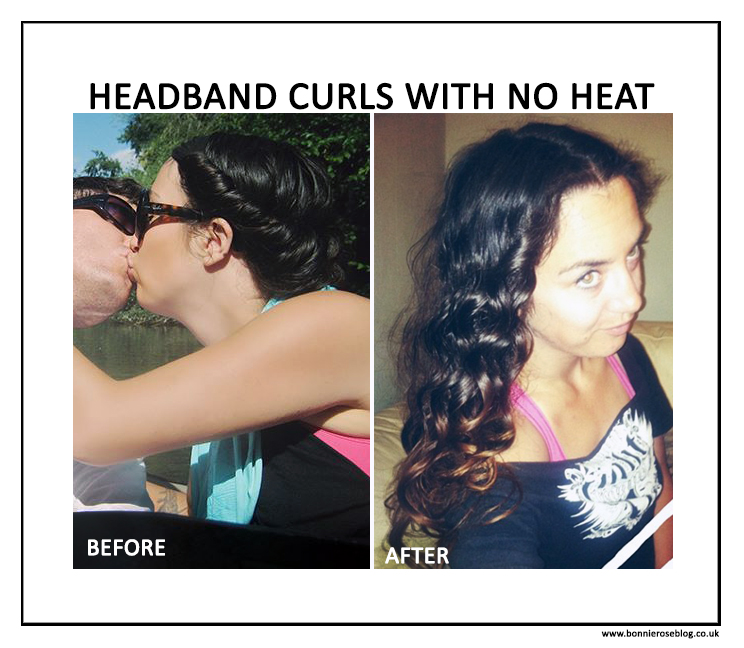
Since I have showed you how I wash my hair with out shampoo, I thought it only nice I follow in post with how I style my hair.
PRODUCTS. I am a product queen. Plus as  a hairstylist I was always coming home with new products and samples.  However since I broke up with my shampoo and conditioner I have realised my hair acts much differently.  I do not need tons of products. I am not using heat tools so I do not need heat protectants.  Honestly my bathroom full of products has been replaced with one: coconut oil.  A little bit goes a long way.  I put a small amount in my palms, rub them together to emulsify and the us sparingly.  It is the best product for my hair! We use this product for so many things in my house we are always running out!  Which ignore any frizzies in the photos of this post as we are currently out of coconut oil until our next delivery.  Coco powder has been great as a ‘dry shampoo’ and along with the coconut oil makes me smell like a cookie.
DRYING.  I do not use the hair dryer.  I will say I have used it on a couple of occasions, one being the day of my vow renewal.  Otherwise I squeeze the excess water out in the shower and blot well with a towel. I then air dry and as stated before my hair now dries very quickly. Which I equate to not having used shampoos and conditioners that are filled with chemicals and silicones.
 
STYLING.  Normally I do not do much.  The less I mess with my hair the better condition it will be in as I grow it out longer.  I will take sections starting from my hair line and twist it to help aid my wavy hair into curling nicely away from my face.  I will pin a section back from each side of my face if I am going to be out and I do not want hair in my face.  My favourite thing to do now is curl my hair with a headband.  I have previously done this with the ‘sock bun’ technique and found using three sock buns helped give me even curls. However with three it was a bit awkward to sleep on.  Plus I will leave the house with my hair in the headband, so its a great way to curl your hair during the day, if you want to let your hair down that night.
The above photos were taken on the same day.  I wore my hair that morning curled up around my headband. We spent the day out kayaking along the river and canal near Bath and it was perfect for keeping the hair out of my face.  Normally had I put it in a bun or a pony tail I would have had to fix it or would have kept playing with it. That night I took my hair down to reveal beautiful curls with no heat!
How to Curl Your Hair with No Heat!
Bonnie Rose’s step by step approach to styling your hair.

What You Will Need:
You will need either a circular stretch headband or you can use a scarf.  I found the headband creates tighter curls, wear the scarf will give you looser curls. If you are going straight to bed you can wet down your hair slightly with water. Do not do this with very wet hair or your hair will not dry fully.  Also your hair can stretch longer when it is wet compared to when it is dry which can cause breakage.

1. Comb out your hair with your fingers or a comb and determine your parting.  Now that my hair is long I am keen to use a center part.  Put your headband or scarf around your head like a halo and position accordingly.
2. Start with one side and take a section of hair in your hands. You will hold it up rap it around the headband and down.  Take the same size section and add it to what you are currently holding and repeat.  You will be working your way all the way to the back of your head.  The trick is to take the same amount of hair each time. Do not feel you have to match the amount of hair that you have accumulated, otherwise your curls will get bigger and looser the farther back you go.
3. Once you have finished one side continue wrapping your end around the headband until the end is secured.
4. Repeat on the opposite side.
5. You should now have a Princess Jasmine looking hair do. Enjoy your beauty rest or your day if you happen to do this as a day up style.
6. When you are ready slowly take your hair down.  If you used the scarf technique the easiest way is to untie it from the back and then slip the scarf out from your hair.
7. Using your fingers comb through the curls gently.  You can re curl sections with the direction they are curled to help refresh the look.
8. Use hairspray if you prefer or just use a little coconut oil to tame any fly-a-ways and add shine.

Questions  You Asked
“Is your hair naturally wavy?” 
Yes. It can also be very curly if I kept my hair chin length.  However, with the length of my hair it has weighted down my curls into waves.
“I notice you have an ombre look with your hair colour.  Are you still colouring your hair with no poo?”
No I stopped colouring my hair about fifteen months ago and wanted to grow out my natural hair colour.  So while I have always loved different variations of the ombre look, mine was not exactly intentional. I have noticed that the very ends of my hair are prone to not curl as much my virgin hair so I am wary to colour my hair again until covering up grays is a need. My natural hair is being so much nicer now that I am on poo so really working towards keeping the chemicals away.
“You worked in the salon. How did you ween yourself off of using heat tools and hair products? I cannot live without mine.”
The way my reacted while using shampoos I would not be able to live without my range of hair tools and products either. My hair really does react better without the chemicals.  I will still use my hair dryer or other heat tools sparingly for special occasions but it works against my main objective.  Long hair.  Anything you are do to your hair is going to damage it, including twirling it around your finger. I just try to work at doing what I can to promote healthy hair growth.
“Do you have a favourite homemade hair mask?”
I use to swear by my monthly coconut oil masks. They really promoted shine and helped my ends.  I did it once with my new routine and found it was very difficult to get all the coconut oil out of my hair.  There are many natural ingredients that are great for hair masks like raw honey, raw aloe, non-fat plain and organic yoghurt, avocado, and egg yolks.  I have not tried every combination yet but so far have tried two which both have included raw honey.  My first thought was ‘honey, will that not make my hair and scalp sticky?’ but it really works!  Raw honey works as a humectant and is amazing on your hair for moisture, shine, and softness.
Raw Honey & Aloe
I used the aloe straight from the aloe leaf and mixed with honey. Make sure you are using all natural organic ingredients.

Egg Yolks & Honey

The benefits of egg yolks are that they reduce breakage and support strengthening your hair.  I used the following as a ‘moisturizing wash’ to help my hair at the 3+ month mark.  I would definitely use it again as a mask.  Two egg yolks, 1 Tbsp of honey, 1 Tbsp of vinegar, and 1/2 Tbsp of baking soda. It will make a frothy mixture.
———-
That is my story about ‘No Poo': I Broke up with my Shampoo & Conditioner.
Feel free to ask me any questions!
*Images belong to Bonnie Rose Photography © 2007 – 2013 All Rights Reserved | www.bonnieroseblog.co.uk

Room For Improvement £50 Challenge

DIY Map Art

I was asked to participate in the Room for Improvement challenge by MoneySupermarket.  I had the weekend to improve one room in my house with a mini makeover with a budget provided of £50.  I thought it was a great challenge to see what I could do on a small budget so that I could show my readers that its not just about money, but creativity and ingenuity.

The Room for Improvement: Living Room.  I chose this room as we spend a lot of time together in this room.  We work, read, play games, watch films, and do homework.

Previous Design Choices: Prior to this challenge we swapped out our three tall bookcases for just one and two of the 2 by 2 cube IKEA shelves from my sons’ room.  We flanked the one tall bookshelf by the fireplace and the put the two square shelves in the nook by the window.  Our newly acquired sofa (we went months without a proper place to sit) can only fit against the one wall.

Challenges:

  • Renting.  Since we do not own this property we can not do any painting of the walls, changing of the carpets or flooring, and limited by not being any new holes (ie by nails) into the walls.  
  • Wallpaper. Our walls are all wallpapered and as we are renting we are pretty much stuck with whatever colour and pattern that exists currently. 
  • Carpet. As we have to work around the carpet it limits me by its blue colour and its slightly busy pattern   It is quite old with what I can tell is set in chemical stains from previous tenants.  If we owned the place I would have replaced it already with wood flooring. 
  • Room layout.  There really is only so many places I can put the sofa and our tv stand given the dimensions of the walls and placements of the doors, the heater, window, fireplace, and window.  
Having never lived in one place for longer than three years at a time and sometimes for only a few months, I am quite accustomed to having to work with a new space. I am also used to being creative when it comes to redecorating and improving a room in a place that you rent.  Had we owned this property this would probably be a DIY of painting the walls, pulling up the carpet, and fixing the floor with reclaimed wood.  Since that is not the case I would like to share with you how you can improve your room with £50 or less.  As some of my room improvement tricks work well with what you already own.  Let me show you what the room looked like in the beginning.
T H E   B E F O R E   P H O T O S : 
Here you can see all my sons’ legos have taken over almost every surface in the room. We do live and play in this room quite a lot and it has become more of the lego room than anything else at this point.
A blanket thrown over the couch, mismatched toy tables for lego and another token IKEA chair. Not much of a vision really going on at this point. 
Here you can see signs of the birthday party a couple weeks past with the bunting and birthday cards. Oh did you see that in the corner? More legos in large containers hide up on the bottom shelf. 
THE PLAN:
1. Clear out what is unusable, not needed, outdated, and not working in the space.  This is the perfect time to pick up all the orphans from other rooms that have found their way into cluttering the space.  For me this was clearing up from a birthday party with the displayed decorations and birthday cards.  There were also a huge amount of my sons’ Legos out from the last two weeks worth of Lego builds.  

2. Search your house for furniture and items that may work well in the new space. 
Our coffee table was not purposeful for lego play and had been previously swapped out with smaller mismatched tables.  I decided to move those out and bring in the coffee table. I also brought in a small half circle glass table which has made its rounds through out my house and now has found a home in this space. I brought in a chair for reading that had been in another room.  

3. Move furniture around the room to give a more desirable affect of space.  While I would love to move the sofa it is perfect where it is now.  Our television stand had been cocked at an angle to round out a corner or the room and make it easier to view from the sofa.  However our XBox has since stopped working and since we do not get cable television, the telly has become more of a piece of wall art.  I decided to move the tv stand back into the wall until it was flushed against the side of the fireplace.  

4. Change or rotate items to give a different dimension to the space. We have a mirror that was hung horizontally above the fireplace.  It no long hangs from the hook and rests right on top of the mantel. Due to this we can see an unslightly nail. I decided to rotate the mirror so that it stand vertically and above the fireplace it gives a nice tall line.  This can also be achieved by hanging your curtains taller than the window and getting longer curtains that touch the floor for an elongating effect. Since we have book cases in the window nook this would not work with our space. 

5. Change out the light fixtures. We have one light fixture in our living room and was a blue shade that matched the carpets. It was nice enough but since the ceiling is white it became more of an eye sore up in the middle.  I replaced it with a matching white shade for better lighting and a more seamless look with the white ceiling. 

6. Use what you have. Working with the decor items you have on hand go through and fix the placement of items in the space.  Try a few different looks and if something does not look right, take it out of the room.  I reorganized our displayed photographs and added touches of horses to match the western flair.  I brought in travel items for decor, like a small globe, the eiffel tower, and pieces from our travels.  To fit the travel theme I also showcased a few travel books.  I have acquired a scarf that has the world map on it and have decided to repurpose it with shielding our tall bookshelf.  what I like about it is that it is slightly transparent so that you can see the books from behind it while still recognizing the continents and countries displayed on the fabric.  
7. DIY projects. With the ease of Pinterest there are so many DIY projects you can do at home to upgrade and improve your room.  I took three blank canvases and an outdated travel book from Hawaii to make pieces of wall art to hang on the blank wall behind our sofa.  I used big hearts for the two places on the island where we rented and where we owned a home. I cut out little hearts for meaningful places on the island like the hospital where my son was born, our favourite beach, and the base where my husband was stationed with the military.  It has provided us with simple and clean art on our wall that means so much to our family.  The added bonus was realizing afterwards how the colorization in the map blends well with the colour of the wallpaper. I was able to hang them up by using a wall friendly adhesive strip that work like velcro without making any holes in the wall.
8. Bring in new items.  As I was given £50 to spend on the room for improvement I went into town planning to only buy used items from charity shops. On top of finding great deals for previously owned items the money goes to charity.  However that did not go to play this time around.  I was planning on buying items I found, instead of going in with a plan of what I wanted and it can be a hit or miss at the charity shops.  With being on foot and having to carry everything home I changed my game plan after attempts in two shops.  A T.K.Maxx just opened in Bath, England and they have a pretty nice selection of home wares   Sure enough in about twenty minutes I was ready to check out after spending close to the £50.  
 T H E   A F T E R   P H O T O S : 

Also to note I used one of my fashion photographs from Hawaii under the glass table top and recovered the IKEA reading chair with our Thai bed spread and matching pillow we brought back from Thailand.

 I love the travel accents because it not only fits our family but becomes a great conversational starter.
 I do plan to eventually use the fabric over the couch to make additional couch pillows.  I found the fabric earlier on in the year at a farm shop in the vintage second hand section and fell in love with the pattern.

On top of the bookshelf is my Eiffel Tower figure, a ceramic paint painted with a scene of the Bay of Naples, where I grew up as a child, and a smaller globe that had previously been in my sons’ room when they had an Indiana Jones themed bedroom. 
 The photos on the shelf are mostly of my family during those silly western styled shoots.  The two that are not fit in with the theme.  One is my oldest at two months old when I dressed him up in his Build-A-Bear cowboy outfit and the other is of my dad, mum, and my husband when they got their photo with Woody at Disneyland.  My dad is in half of the photos and since he has passed away, they are my favourite ones to display.   There is also a hores shoe turned hook and the symbolic gift of a girl horseback riding my husband gave me as a place holder for a new riding helmet.

Though this little table will have to move when I need to dry laundry, we really wanted to make use of the wasted space the space heater takes up.  We decided to use the table that matches it in colour to keep it friendly to the eyes.  Would like to eventually get a table that half the normal table size in width to go over the space heater and give us a place to set our drinks and decanter. 
This is close up of the fabrics included in this room for improvement challenge.

What I Purchased:

A Globe. As we sort of had a few travel items already I chose a nice focus item to help solidfy the theme of the room.  It was £24 and at half my budget it was a risk I was willing to take after finding everything else I needed for such low prices.  I normally never would buy something like this for myself and it was lovely to be able to improve my room with such a great accent piece. 
Black Place Mat. This item that I found in the kitchen area has a faux leather appearance.  I liked that it matched the globe  and knew it would tie in well with other black pieces in the room. Since our coffee table has grid like holes in it, having a nice flat surface would be a great improvement when it came to having a place to set our drinks.  It was only £2.99.
Two glases and a Dish.  Setting out to find some texture and detail to put in the space I found these two glasses and matching dish.  I though this would be perfect for my husband and I who like to enjoy a drink together after the kids go to bed.  The dish would be perfect for a snack item, like the olives pictured in the after photos. Remember just because an item has one intended purpose, does not mean it can not be used for something else. This was true with these three items which were sold to be used in a bathroom. However they fit nicely in our living room and are pictured as vases here. 
Glass Container with metal stamped lid. I was originally looking for a large vase I could display items in. Something that I could easily interchange for seashells at summer or christmas bobbles in the winter.  I found this lovely piece for only £5.99 and decorated it with silk flowers I had in storage. 

White Paper Lantern. When I saw the price for this at a hardware shop, I could not leave without purchasing it.  It was a simple, easy, and cheap way to improve the room. I just wonder why I had not done this sooner. This cost £3.

The Breakdown:
Globe – £24.99
Glass Container – £5.99
Two Glasses – 7.98
Dish – £2.99
Placemat – £2.99
Light Fixture – £3.00
Total: £47.94 


After the room was all ready and the photos had been taken I called my husband in from outside.  He was improving our backgarden, where the grass has been growing like wildfire.  What better way to refresh from the hot sun then a nice glass of white wine and some olives to snack on too. 
So this was how I tackled the Room for Improvement Challenge in a rented house with just £50.  
Q: What do you think?  Any thoughts or suggestions?

I broke up with my facial cleanser

Tuesdays Tips & Tricks 
“Are you suggesting coconuts migrate?” – Monty Python and the Holy Grail

In the last several years as a Beauty Therapist and Hairstylist, my bathrooms in all the places I have lived have been littered with a vast array of beauty products.  Though some have come and gone, others made reappearances through out the years.

Coconuts.  I grew up thinking they were funny. I also grew up with monty python and if you did too you can connect the dots.  On my honeymoon in Cozumel, Mexico I realized just how yummy coconuts can be.  A few years later my husband and I  had the pleasure of living in Hawaii, on the island of Oahu, for four years. My youngest was born there and my kids grew up with the sweet pleasures of island life.  Though we no longer live on the island, you cannot take the island out of this girl.

Coconuts for cooking? Yes, please!

I love to try new things and a couple of years ago we tried coconut oil in our coffee for health benefits.  This went on to be used in replace of other oils in a lot of our cooking.  Thanks to sites like Pinterest the many uses of coconut oil has been revealed to so many.  To be fair since we began buying it by the jar fulls, I feel like I am a constantly finding new uses for this miracle oil.

When it comes to facial cleansers I am a hopper.  I will try this one for a while and then try something else.  Maybe perhaps because my skin is never normal.  It may be beautiful and perfect for a few days then the next week its broken out and then the next its really dry.

What is a girl to do when she is unhappy?

Break up.

Since 2003 I have been using a little bit of bicarbonate soda (baking soda) mixed in my facial cleanser of choice a few times a month to exfoliate the skin.  So when I heard I could mix it in with coconut oil in lieu of my facial cleanser it made perfect sense.

Here are my tips for breaking up with your facial cleanser with a DIY option:

What you need:
Extra Virgin Coconut Oil
Bicarbonate Soda/Baking Soda
Baby hair brush
Water
Facial towel

Steps:
1. Flush your face with warm water to open up your pores.
2. Mix a small amount of bicarbonate soda in with the same amount of coconut oil.  My oil tends to be in a solid state.  Make sure to warm it up in your hands to cause it to liquify.
3. Once the two ingredients are mixed together well you can apply it to your face.
4. Rub gently in circular motions with the pads of your fingers.
5. Using your baby hair brush which you have warmed up under hot water, continue to rub your skin in soft circular motions.  Only do this step once a week for extra exfoliation.
6. With your hands rinse your face with water.
7. Use really cold water at the very end, flushing your face a few times.
8.  Pat, do not rub, your face with a clean facial towel.

Advice:

  • It is advisable to try using the bicarbonate soda every other day and use just coconut oil for washing your face the days in between.
  • Your face will appear oily as soon as you are finished but the coconut oil will absorb into your skin within minutes.
  • Use extra coconut oil (small amount works wonders) on any spots as an acne treatment.
  • Consult your doctor if you are unsure about any sensitivities you may have as I speak just from my personal experiences from using this on my skin.  It works GREAT!
My final thoughts after breaking up with my facial cleanser:  Why didn’t I do this sooner?!

 
My skin has been clearer and I have not had any new breakouts since trying this out.  My skin is also getting moisturized so well by the coconut oil that my makeup goes on a lot smoother. Since the coconut oil cleanses, tones, and moisturizes I have a lot of extra space in my bathroom cabinets that is much needed!  But the best part…
 
…I smell like coconuts and cookies all day and night long. 😉 Yummy. 
* Photographs belong to Bonnie Rose and cannot be used without written consent.