“I can see Pinterest becoming the modern woman’s evolving handbook of life.” – Bonnie Rose
I found out about Pinterest after moving to England in 2011 from a friend over facebook. Pinterest had not officially come over to the UK yet. However after seeing a short article about Pinterest in the Stylist, a free weekly woman’s magazine in the UK, I began talking about it with my clients at the salon where I worked. Especially for the younger generation Pinterest seemed to be a simple answer for my clients who were redecorating their rooms, looking for new fashion ideas, and needing new hairstyle options. I started having my phone on me so that I could pull up my own pinterest boards as reference for haircuts or letting clients search pinterest on my phone for ideas. Google is great and but when it came to coming up with quality content from searches, Pinterest was hands down the best option for my clients.

Pinterest has now come to the UK and many bloggers have been asked to blog about Pinterest with #PinItForward As a Pinterest convert myself and who would share it with anyone I met, I felt I should now share it with my readers. This is my post about what I love about Pinterest and how you can make your Pinterest page and boards exciting for other users.
W H Y I L O V E P I N T E R E S T
and how board & pins can change your life
The main concept I love about Pinterest is being able to brainstorm and save ideas about the things I love most about life. I love to plan for future life events like birthdays, holidays, my vow renewal, pregnancies, and when I finally have a girl of my own. I can search for and save tips for when I need advice on my marriage, holistic health options, and for fixing things that break or go down when my husband is away. Pinterest has also become the hub for everything DIY. There are so many that I have categorized my Do-It-Yourself pins into separate boards of beauty & health, tricks, crafts, OCD (organization), gifts & toys, and decoration. Basically any facet of your life can be made into a board and the ideas you find online pinned to it for future reference. Which leaves me with only one question? Where was Pinterest when I was planning my wedding ten years ago in 2003?
M Y P I N T E R E S T B O A R D S
and what my boards & pins say about me
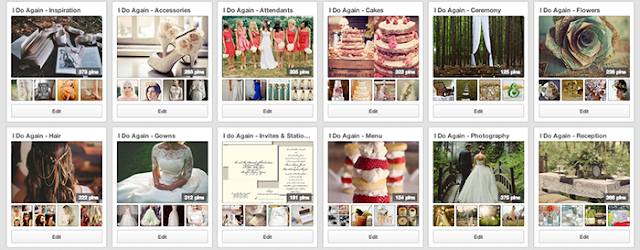
Currently my Pinterest boards say I have wedding fever. As I am planning my 10th Anniversary Vow Renewal in August, Pinterest has become my best friend. I did have one board, but found with pinning so many things in a complex subject it was hard to go back and find anything. I now have twelve separate boards with the prefix title of ‘I Do Again’ to aid me in my endeavors. I have boards for pins in so many facets of my life as a female, a career woman, a wife, and a mother. I can see Pinterest becoming the modern woman’s evolving handbook of life.
W H O S H O U L D B E O N P I N T E R E S T
and why it is not just made for stay at home mothers
My mum, who has embarked on a new life path, pins on boards focused around her new career choice. My husband, who works in the field of international relations and risk analysis, pins as an extension of his blog. My children, ages eight and six, pin ideas for their upcoming birthday parties on my pinterest account. That is three generations of pinners in my family alone. I find it is a good example of how the process of saving ideas is timeless and for all ages and backgrounds.
W H Y I R E C O M M E N D P I N T E R E S T
and how everyone benefits from having a board
If something works for you in your life you more inclined to talk about it with others. Be it a new product from the store, a new hairdresser at the salon, or new parenting tactic with your children. I have found Pinteret to be a positive source of vision that translated well into intergal parts of my life. I have used it to plan parties, to put together a new outfit, to find new beauty regimens and find new recipes. However you do not have to have as many boards as I find I need myself. Even one board could benefit your life. If I was to recommend one board that would fit everybody I would say to make a ‘Vision board’. Give it a unique name with a personal description that fits your life goals. Pin things you find online and from browsing Pinterest that represent that goal or dream. Use your board to identify with your vision and goals. Pin now and read later to reinforce your wants in life and what matters most to you. Be specific with the pins on this board to keep your attention on your intended goals. Perhaps you pin a few now and then come back later. You never know when things you have pinned will be quite helpful to you in the future.

H O W B E S T T O U S E P I N T E R E S T
The Best Tips I Have Found To Be User Friendly
1) Have a Smart Looking Profile.
- Choose a username that matches your online personality. If it is mainly personal use your name. If you own a blog you could go with your blog name. If you own a business create a business Pinterest account with your company’s name.
- Choose a clear and eye catching profile photo for your profile picture.
- Have your About You section filled with a short, sweet, and concise description of who you are in under 160 characters. Key words are vital.
- Add your website and verify it for use of the analytical features of Pinterest.
- Simple is Best. Keep your pages looking attractive with simple descriptions. Do not make lengthly paragraphs with too many hash tags.

2)
Have Unique Board Names. Many people like to have a board for hairstyles and haircuts they find online. How many of these users do you think use the title ‘Hair’ for their board? Quite a number of them as displayed in the image below. Instead of getting lost in the pack, choose unique names to make your board stand out from the rest. Make sure they are relevant to the subject but stand out amongst the crowd.
3)
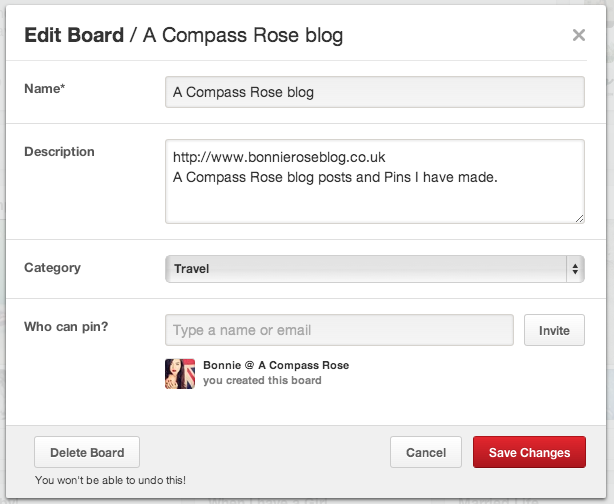
Board Descriptions. Each board can and should have a good description with key words and phrases to go with it. This helps other pinners know what content is found on that board and for when searching for specific content. You can use up to 160 characters in your board descriptions. Links and hash tags are not needed in this area. Also make sure that you place your board in a specific category related to that subject.
4)
Pretty Cover Photos. Each board can have a cover photo. I recommend making sure each one has the best eye catching photo and which may be the most likely to be repined. You can also keep updating these images so that your boards always look fresh and current to pinners who follow your boards.
5) Use Pin Descriptions. Include several key words. Make it Personal with using ‘your voice’ and even try to be funny. Use trending hashtags, but do not go overboard. I have heard conflicting information whether Pinterest is currently using hashtags for when it comes to searches. However hashtags are great to have for pins that get reshared over twitter.
6)
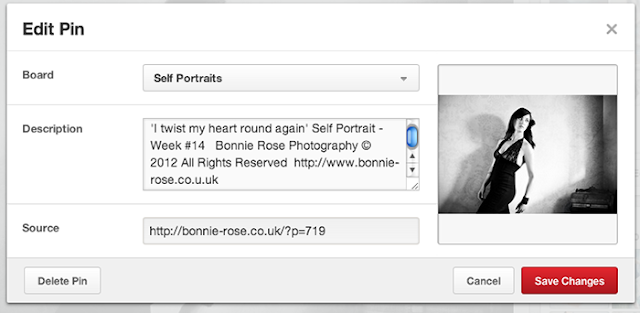
Post Unique Yet Related Content. There are so many pins that get recycled over and over again. If your followers are avid Pinterest readers more than likely they have seen many of those popular pins before. Find new content aside from just repining what you see from other users. You can do this easily by adding the Pin It Button to your browser. So anytime you are online and find something new you can pin it directly to your boards. Make sure you also pin things that are related to your Style, your image, or your brand. Furthermore add in the description your explanation on why you think it is interesting. This will engage others to comment back and repin.
7)
Keep Your Pins Pretty. For the way Pinterest was created vertical photos for pins look more pleasing to the eye than horizontal ones. If your are pinning photos from your website, think about cropping your photos to be taller to be more eye appealing. The prettier your pins, the more likely another user will click it or repin.
8) Check Before you Pin. Just as you would read the label before buying something, do not take a pin by its word. Just because that photo looks pretty, does not mean you actually want it on your board. You should always check the pin to make sure that it doesn’t go to spam, that it is content you want to share, and that the link indeed works.
9) Watch out for Duplicates. I believe Pinterest has set up something new to prevent you making duplicate pins. However it is always good to go back and check your board to see if you have already pinned something already. A great practice to help keep your boards clean and organized.
10)
Do not Over Pin. If you overwhelm followers with too many pins per day, they may stop following you. Think before you pin. If you find Pinterest to become a black hole that sucks much of your time away, give yourself an allotted time to be on the site and then move on until the next day. No need to repin items to your exercise board for an hour, when you could be doing an actual workout.
11) Keep the Boards Organized. This could be by grouping similar boards together or even alphabetically. Feel free to continually keep your boards organized by moving them around to keep the most engaging boards in the first two rows. These are the first boards other pinners will look at when searching for pins or interesting boards to follow.
12)
Tag other Pinners. To increase engagement between members, you can tag other pinners. This is great if you want to share something you pinned with someone you think might find it interesting. However it is even more beneficial for you if you tag the original pinned of that pin as a reference. Just put the @ symbol followed by their interest user name and they will be alerted to the fact that they were mentioned. By doing this every time you repin you will be introducing your boards to many other pinterest members. This engages communication about things you both have an interest in on your boards.
13) Be Involved in Group Boards. Pinterest users can create boards with other users to pin together towards the same goal! This is not only a great way to help each other out but to build a community. It helps in cross promotion and finding new followers.
14)
Analyze Data. You will first need to go in setting and verify your pinterest boards. Once you verify your site you can have access to an Analytics section. You can check your site metrics which includes: pins and pinners by day, repines and repiners by day, impressions and reach by day, and clicks and visitors by day. You can also check the most recent pins, most repined pins, and most clicked pins.
You can also other websites like:
15)
Promote with a Link. Always include a link to your brand from your pins and vice versa include a link to your interest boards on your blog or website. Do not let any opportunities become missed opportunities when it comes to new followers.
16) Have fun! Pinterest should be fun and if you find it to be work maybe you should take a step away for awhile. I equate it to trying to build something with legos. After awhile things can get frustrating and it just ends up in more frustration. Just step away, enjoy life, and come back when you are ready. Remember too much of a good thing can be bad. Life is too short not to have fun. Enjoy Pinning!
****
Since growing sites like Pinterest are constantly evolving, things will change. In the act of researching before writing this post I learned a lot myself about ways I have been neglecting my own account. I look forward to correcting my bad Pinterest habits and making some positive changes from what I have shared with you today. I hope this post has helped you learn something new if you are already in love with Pinterest already. If you have any questions post a comment below.
P I N I T F O R W A R D U K
Most recent pinners on I love to follow
Q: Do you have a favourite Pinterest board you follow? Let me know which one in the comments so that I can check it out!
Cheers,
Bonnie Rose
