Category Archives: phototips

Photography: Camera vs. Knowledge

BRP_0301

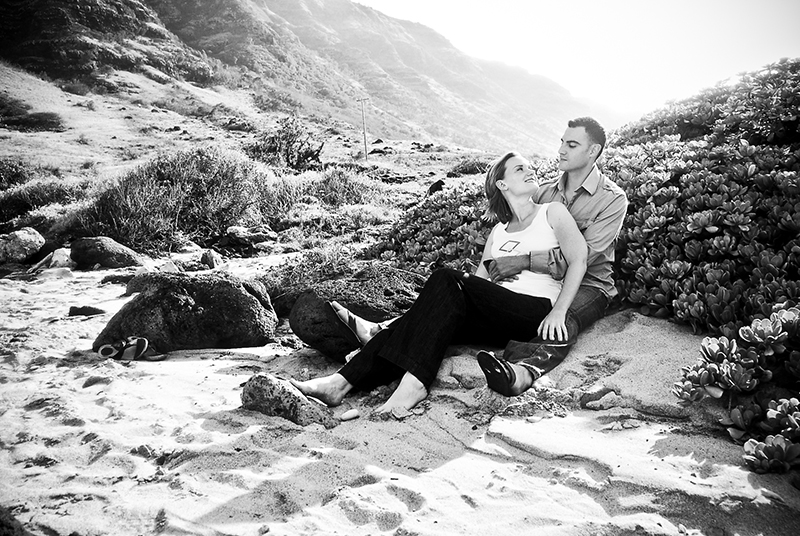
My passion is photography. It is the reason I cannot be too far away from a camera.  My kids are growing up knowing how to pose for ‘mummy’ and are learning how to use a camera themselves.  My favourite thing about photography is how it is not limited to just one kind of person or even one kind of photographer. While I love to shoot travel photography, people, and self portraits you may like to photograph animals and pets. Perhaps you like to capture the little details around in life or maybe you are fascinated by black and white photos. When it comes to photography, the world is your oyster. Be inspired. Pick up your camera and shoot what you love to photograph.

MOST ASKED QUESTIONS
Every week I get emails, comments on the blog, and messages across different social media platforms about camera equipment.  The most asked questions revolve around what camera I shoot with, what camera I suggest they get, or to give my opinion on which camera brand is better: Canon or Nikon.

I get it. Years ago when I was ready to get my first DSLR and I felt I had to get a Canon camera. Why? Due to the fact my favourite photographer used a Canon and since I was interested in fashion photography at the time I found most of the photographers I followed all shot with a Canon. My husband on the other hand was sold on getting a Nikon because he believes they have better quality glass (aka lenses) and we ended up getting a Nikon DSLR. I remember being sad at first that I lost the Canon vs. Nikon battle, but in the end that was ludicrous. Any bad photos I took when I first go that camera was not because it was a certain brand, it was because I was not an expert with using my camera yet.  I shot mostly in auto modes (this means aperture priority and shutter priority too) and was still getting photos that were blurry or with the incorrect exposure. Not to mention all the other facets of photography that I was not fully utilizing like composition, telling a story, and creating interest.

What Camera You Have vs. Lenses & Knowing How to Shoot in Manual 
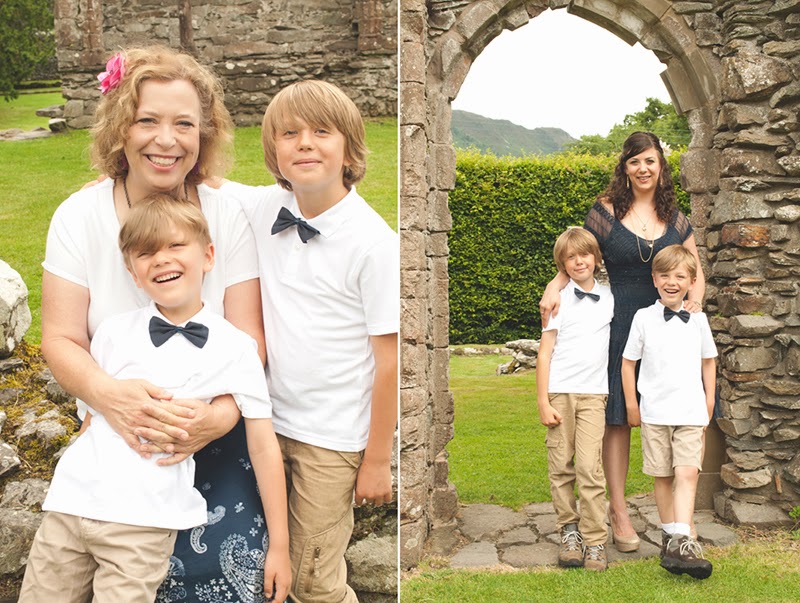
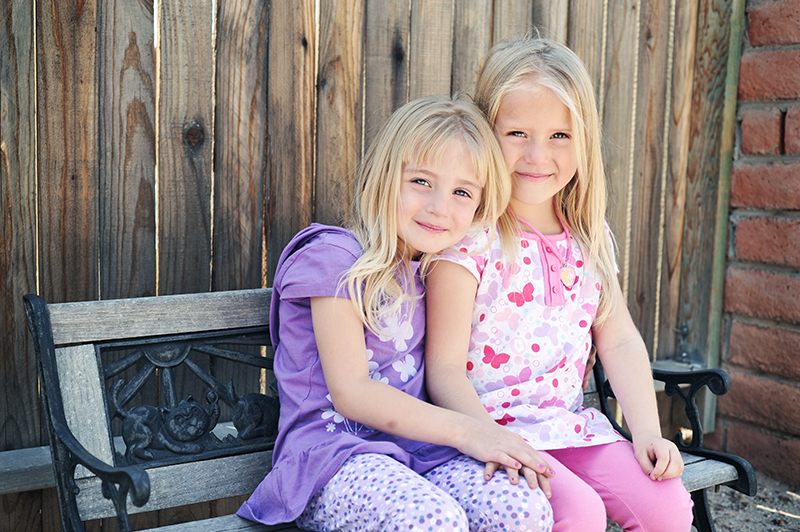
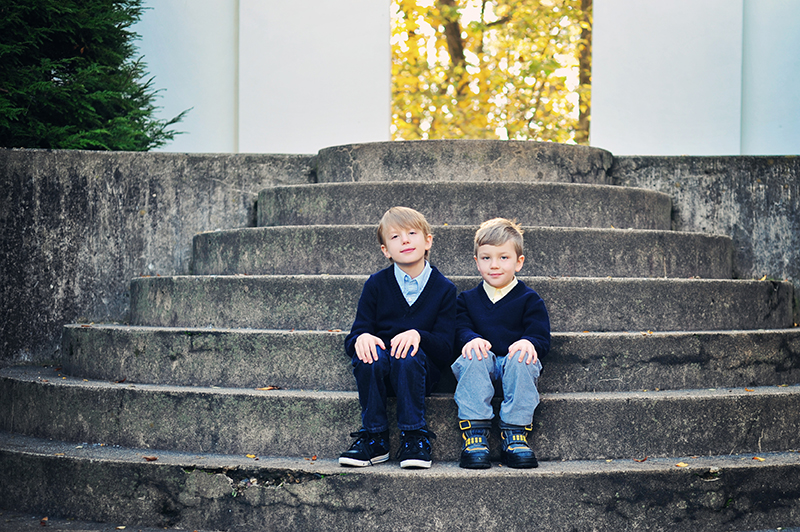
Honestly it does not matter what camera you have or what camera brand family you use. Yes there will be differences between cameras. Comparing two different Nikon cameras that I have owned one could shoot with an ISO up to 1600 while another up to 3200, meaning the second shot better in low light situations. However, I have also taken photos with both cameras and have had people choose incorrectly which camera shot which photo. Take a look again at the photo I posted of my sons.

BRP_0301

The blurred background behind them was not created in photoshop. This was shot in manual on a sunny day in open shade.  I wanted to create a shallow depth of field, meaning my subjects would be sharp in focus while the backdrop is blurry.  This is great for portraits because it draws your eyes to where your focus is in the frame.  I could have equally shot this with a different lens that does not have as wide an aperture at 1.4 and it would have come out differently. Or I could have used the same lens and on my camera changed the aperture so that everything in the frame was in focus.  I could have also had my kids step out of the shade and have the direct sunlight blind them in the eyes and cause harsh shadows on their face.  Take it a step further and I could have not got in close to them so that the sky would also be in the photo and rely on my camera to expose the photograph for their faces in the shade, making the sky overexposed, void of detail, and bright white. Of course in manual I could now compensate the exposure so that I have better exposed skies while still being able to have my boys nicely in the shot. You could basically have a line of photographers all shooting with the same camera but different lenses among them shooting at different settings (in regards to aperture, shutter speed, and iso) and have a different photo from each photographer. That is what inspires me as a photographer knowing how much control I have in manual as well as how much creative control I have to get to my end result.

With that said you do not need a fancy DSLR to take great photos. You can do it with a simple point and shoot with manual capabilities.  You own the technology and I encourage you all to push yourself this coming year to learn more about what you are capable of with your camera.

Need more help? Wondering why your photos are not exposed correctly?  Wondering how to get sharper clearer images?  Wondering what all the buttons on your camera do?  Then I suggest B. In Focus, which teaches to to shoot in manual while building you up as a photographer with your creative vision.

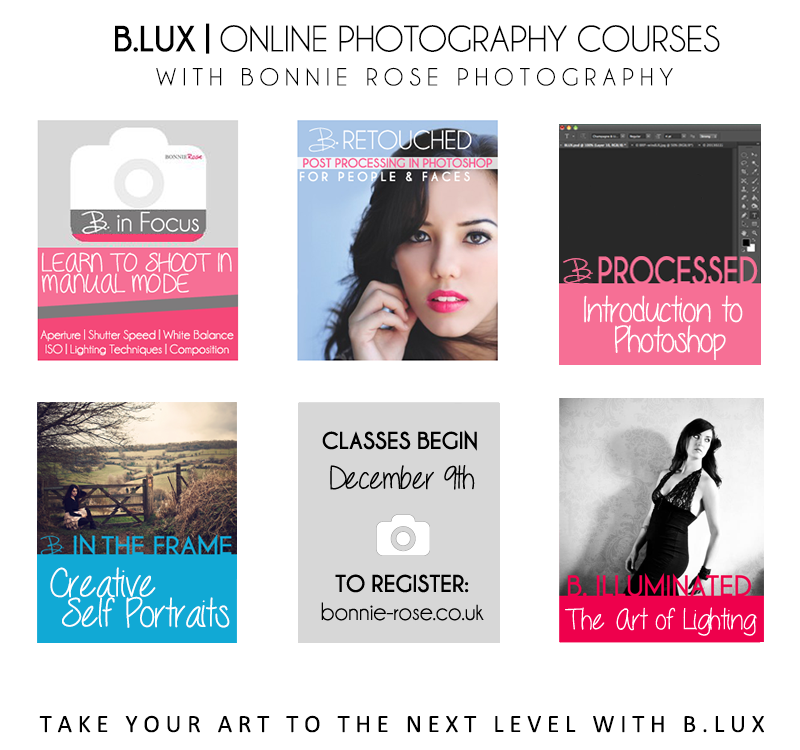
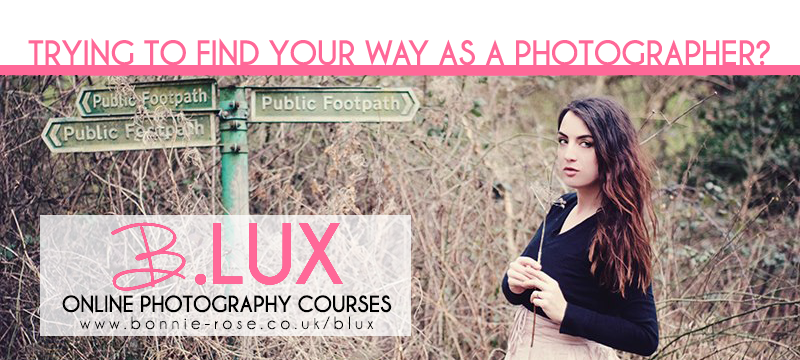
NOW 4 NEW CLASSES JOIN THE B.LUX ONLINE CLASS FAMILY!

B. In Focus | An intro to photography course that teaches you to shoot in manual. Also great for intermediates who need a refresher on how to get their camera to do what they want it to. We cover white balance, aperture, shutter speed, ISO, lighting techniques, composition, and creative elements of creating a photograph.

B. Retouched | A post processing class in photoshop for retouching people and faces.  We cover different ways to retouch people of different ages, quick fixes, and even how to apply make-up in photoshop.  If you are a beginner with photoshop, do not fear as we cover everything you will need to know to complete this course.

B. Processed | Geared towards the beginners in photoshop for photographers and bloggers. Learn what to do with your photos out of the camera to make them web ready.  From saving, archiving, organizing, and protecting your images to cropping, resizing, layers, and other elements in photoshop to make it a fun and simple process!

B. In the Frame | Love photography but want to learn more about your camera and push yourself further?  Self portraits are a great way to gain experience and learn new techniques.  With this course we cover creative self portraits which begin before you even pick up your camera, during the shooting process, and afterwards in post processing. If you are ready to embrace the creative side of yourself and create art this is the class for you!

B. Illuminated | Photography is all about light! B.Lux got it’s name from the measurement of light and in this course we go in-depth in lighting approaches and techniques. From shooting in natural light, in low light, and with additional light sources. I show you what you can do for a lot of money and what you can do for little to no additional cost.  We work both inside and out on location and you can learn all from the comfort of an online class and working on your own time. Get ready to embrace light and take your photography to the next level.

BLUX_COURSECAT

B.LUX Alumni | What they are saying about their course:
“Having bought a new DSLR and knowing little about using manual, I decided to try Bonnie Rose’s B.Lux photography course, B. in Focus.  After seeing Bonnie’s photography on her blog and having conversations with her, I knew I wanted to learn more from her.  I now have the basic concepts of using my camera in manual and I no longer need to bring a back up point and shoot on my travels.  Bonnie is great and if you need a push to get yourself learning in manual then this course is for you!” – Brittany

BLUX_findingyourway


 For more information and to register for classes:

http://www.bonnie-rose.co.uk 

* Bonnie Rose Photography © 2007 – 2013 All Rights Reseved

8 Tips for Family Photos on a Trip

8 Tips for Family Photos on a Trip

For me when I think of the holidays the first thing that comes to mind is family.  Directly after that my mind wanders to locations across the globe.  Basically because my family is spread out and we have not all ever lived in the same place.  There will come a time in the near future where my side of the family will be split up on four different continents! Returning to a childhood home in the states every year for the holidays just does not fit our expat family.  When it comes to planning our upcoming holidays my family has decided we will start choosing destinations where we can all meet.

TRAVEL PHOTOGRAPHY + FAMILY PORTRAITURE 

Now not only will we be wanting to focus on our travel photography on our holidays, we will want family portraits at the same time too.  For us we never know the next time we will all be together in the same location, let alone that destination.  Time is precious on holidays and when it comes to family photos quality wins over quantity.  Take 600 photographs of your travels with family member scattered in the mix but do not get one great group shot of everyone and the opportunity is gone. How do you plan family photos when there is already so much going on with the holiday and travel plans?

Family Photos Wales

How to take Family Photos on your Travels

1. Communicate with your Group | Once everyone knows where you are going for your holidays it is time to start talking about the photographs.  My family knows that when I leave the house I will have a camera on me.  However, I cannot pretend that everyone is a mind reader and will know that I want to get family photos.  Some people will need reminding, others coaxing, and some will want fair warning so they can be feel amply prepared.

2. Prepare Before Leave | Any task will be pulled off more efficiently with before thought and preparation. Think about the location you are traveling to and how far your family will be traveling from.  It is best to not to ask your family to bring a lot of extra clothes or props just for a family photo.  With the right preparation and communication you can still pull off a rather stylized family shoot.

3. Stylize your Shoot | Think of a colour scheme that will work well with your group and let everyone know in advance.  However do not then leave it up to chance.  You either risk having everyone wear the same outfit or having one person looking out of place because perhaps they did not have dark trousers and wore light blue jeans instead.  The key is coordination and simplicity. For balance check ahead of time what everyone has and what they are thinking of wearing. The best way I have found this to work for my family is to think of a basic colour palette that you know people will have and then build on it with a little bit of colour.  Have different members of the group ‘pop’ that colour into their wardrobe in different ways.  If your ‘pop’ colour is green you may see it introduced in different items of clothing on each person and even in accessories like hats, hair pieces, jewelry, ties, scarves, and shoes.

4. Posing | Once you know what people are wearing you can work with colour balance and family relations to decide who will stand where in the photo.  Before hand look at family poses online that you like and bring it with you on your mobile device or printed out for reference.  You can try different poses but go with your favourite pose first. This will be beneficial if you are working with children (or adults) with short attention spans or a dislike for having their photo taken.

5. Be Efficient | If there will be children, older family members, people with special needs, or pets in the photograph, let them relax until you are read to start snapping away.  Let the other family members work with you to set up the group shot first.  Once you are ready to add everyone in then get ready to smile and aim to get ‘the shot’ there in the beginning.

6. Timing | It really is everything.  Think about the time of day you are shooting and how it will affect lighting and shadows.  Also take in account how the time of the photo will affect the members posing.  As my family photos involve children I like to take photos when they are not hungry, not tired, and before something that they can look forward to after the photos are finished.  My favourite time of day is the golden hour after the sun comes up. Others also like to shoot during the golden hour in the evening during the last light of the day.

7. Take the Shot | Whether you are having someone else take the photos or  you are using your camera’s timer or a remote, remember you are working with a group of people in one photo.  This means some people may be blinking or making a strange face in one shot, while looking great in another.  Start with having everyone feel comfortable and relaxed and then take a lot of photos to achieve a shot where everyone looks great.  The shorter the shoot the nicer it will be on those who feel uncomfortable or would rather be doing something else. Make sure to check the photos before you deem the shoot as ‘over’ to know you are satisfied with the results.

8. Have fun |  Once you have the shot you need then let your group have fun. Maybe break out some props to use or bring in elements from your trip to show off your holiday.  Let people mingle, be themselves, and pose with different people. This is a perfect time to get candids!

Family Photos in Wales

There you have 8 tips for family photos on a trip. Perfect for you to implement on your holidays this year!  I have other photography geared posts that you can check out including the How to Take your Family Portraits which you can read by clicking the image below.

howtotakeyourfamilyportraits_ACRblog (1)

If you would like to know more about photography, check out my B.Lux Online Photography courses at www.bonnie-rose.co.uk

———-

Share your Travel stories and wanderlust addictions.


HERE IS HOW IT WORKS:


1. Share a post about travel! From road trips to trips abroad and from past travels to dream vacations. You can write about travel tips and tricks, favorite places to stay, or anything in between! Just make it about traveling somewhere!
2. Grab the lovely button. If you run into trouble, just make sure to mention Bonnie in a link! ;)
3. Linkup goes live every Tuesday after 9 am GMT.
4. Hop around and meet new travel loving bloggers! Link up will be open for a few days, make sure to check back to visit some of the newer travel posts!
5. Please only one linked up post per blogger. Save other posts for future linkups!
6. The First Tuesday of every month will be a themed prompt if you want to join in!


* Photography by Bonnie Rose Photography © 2007 – 2013 All Rights Reserved | www.bonnie-rose.co.uk

* Side by side vertical photos by Miriam Pinkston Photography © 2013

How to Take your Family Portraits

Family Portraits.  We take them all the time to capture those we love and the memories and moments in time.  Sometimes we even jump in front of the camera just in time to be in the photographs too.  With families getting together for summer vacation, I have been asked to give some advice on how to take your family portraits.  There are many variables to consider.  The number one thing I have to stress is to have fun!  Sometimes things just will not go to plan.  Some of my most favourite family portraits are those unexpected moments that just happened to get captured on camera.  In the image below my kids were not dressed especially for the occasion, nor were they matching.  I was testing out a new lighting set up and they wanted to be included in the process.  In the end this was my favourite shot from the session. 
How  To  Take  Your
F A M I L Y   P O R T R A I T S

Prepare.
You can surely take an impromptu family portrait and love the results.  However you could also prep for a more stylized family portrait and take them yourself.  Look over this list of points to keep in mind before taking your portraits is key to satisfaction.  But do not forget about your equipment.  Make sure your camera batteries are charged and with you, that your memory cards have available space (and not just becoming storage to unbacked up photos) and double check your camera settings.  If you shoot in lower quality for selling items on eBay, make sure to change it back to RAW or a higher res for your portraits to save from crying later.

Coordinate.
I do not suggest having everyone wear the exact same outfit.  Just as I would not suggest those that travel to Hawaii to buy all matching ‘Aloha’ shirts and have their photo taken.  The key is coordination and simplicity.  Choose a colour palette and and let everyone dress accordingly.  For balance check ahead of time what everyone has and what they are thinking of wearing.  Otherwise you may have someone’s uncle showing up in blue jeans instead of the suggested khakis simply because he did not have any in his wardrobe.  It will become a case of the ‘one of these things is not like the other‘.  Especially if you are taking a family portrait on vacation you cannot plan on everyone having something that will match.  Plan ahead of time so that you do not run into this problem.

My last family portrait was taken at Christmas time by our home here in Bath, England.  I let my family know ahead of time what the colour palette was and sort of kept tabs on my mum and sister about what they would be bringing.  When it came to plan out the outfits I let everyone ‘punch’ the colour of red in a different way.  I wore a red cardigan, my sister wore red shoes and red accessories, my mum wore a red hat, my eldest son wore a red tie, and my youngest had red stripe detail in his dark plaid shirt.  My husband did not have anything with red but matched the palette.  Since we all punched red into the photo in different ways it did not matter that Ryan stayed neutral because it became a cohesive balance. 

Timing. 
A good rule of thumb for what time of day to shoot is the ‘Golden Hour’, which is the first and last hour of sunlight during the day since the lighting is softer.  You can check online for sun calculators to determine what time you should be outside to do your photograph.  I suggest working together and trying to get it done as efficiently as possible to avoid family members getting restless.  I always tell my boys that if they work really hard to help us get the shot then we can move on quicker to something more fun.  A little bribery never hurts. 

Location.
This may be an integral part of your shot if you are on vacation in a place you would like to remember, like on Lanikai beach in Hawaii.  It may be good to location scout first to make sure the place works and that it is a safe location.  Simple is best and try  not to have too much going on in the background.  I have used brick walls, hedges, and even an open field to set the scene.  Depending on your camera, the lens, and your settings you may want just the focus on the the group with a soft blurry bokeh background.  I suggest keeping away from other people or anything that may clutter the shot and take away the focus.  Let the outdoors be your photo studio and keep it simple so that it works with you for the shot. 

Tripod, Timer and a Remote.  
The family portraits I have shown where I am in the photograph have been taken with my camera on a tripod (or another surface) and with a timer.  Easier would be a remote.  It is how I take my self portraits for Self Portrait Saturday.  I definitely recommend looking into all three if you do not have or know how to work them yet. The photo above where I am reading with my kids was taken with the timer.

Elements.  Sometimes the best made plans can be tested by the circumstances like the weather.  You could have a beautiful set up on the beach, perfectly orchestrated morning to get everyone looking just perfect and  have the wind mess everyone’s hair up.  Two of the family portraits we have done in England have been while it is raining.  Of course the rain did not happen until the camera was set up on the tripod and we were ready to start.  At this point you have two options.  You can reschedule or you can attempt to do the best that you can given the circumstances.

Tips: Keep it fun.  As soon as someone starts getting stressed out or upset it is going to show in the face or body language.  If you are dealing with the wind turn your bodies so that the wind works for you, not against you. If you are dealing with the rain my best advice is to know what shot you want to get and get it. If you are not comfortable with the lighting and cannot get a good test shot, don’t force it.  Go back out when the weather is better.

Lighting.  Not enough and your portraits will not turn out.  Too much and you will get harsh shadows on their face. Be aware of the lighting situation.  When we lived in Hawaii if I wanted to shoot in the morning I would have to shoot early because by 1000 it would be too bright.  In England where we have cloudy skies often it becomes one of my favorite lighting situations as it acts like a natural light diffuser.  If you are shooting outside it is good to have your subjects in the shade with the sun light in front of them.  I used this method above while shooting family portraits on a bright sunny day in Arizona.  I also love shooting with the sun behind my subjects for backlighting.

Tips:  If you are still practicing with backlighting try shooting your subjects with trees behind them and shoot so that the sun shines through the trees.  Keeping your subject far enough away from the backdrop with a low aperture, can result in a nice bokeh affect of the sunlight through the trees.  If you are still learning about shooting in manual and ISO settings check out the ‘Sunny 16 rule':  http://en.wikipedia.org/wiki/Sunny_16_rule for shooting in sunlight. 

Kids & Animals.  They infamous quote is you should never work with children or animals.  However of course those will be the two categories we want to focus on in our photographs.  Keep the little ones in mind when going planning each stage of your family portrait.  If you know the kids will be tired during a certain hour, obviously do not plan to shoot at that time.  It is better to work around the little ones and their schedule.  Make sure the kids present are neither tired nor hungry when it is time to pose.  Bring treats and have something for them to look forward to after the photographs have been taken. 

Props.  They can be fun. Especially with the right group of people a few key props can pull a theme together.  Kids especially will love things they can wear or play with and will be drawn to the excitement.  However make sure you get your standard portraits first. Always aim to get the shot you want in the beginning and then from there have fun.  It could be the shots you do not plan that may surprise you and turn out the best in the end.

Attitudes.  Sometimes it is not the right time to take photos.  If anyone is uncomfortable in front of the camera it will read in the eyes.  If someone is upset it will not only show in their face but will affect the other people in the photograph.  I have taken family photos as a portrait photographer where the husband was in a really nasty mood.  It not only affected the child but made the wife very anxious.  It did not matter what I did to get the mom and the child to smile, the husband was grumpy in ever single shot.  For this very reason on family vacations with my husband’s family I have second guessed my decision to take family portraits.  The camera does not lie and there are some things you just cannot fix in photoshop. Bottom line, do not force a photo shoot if the situation is already stressful.

————————-

SPONSORED: How to Quickly Catalog, Cull, and Edit Photos using Lightroom

My featured sponsor for the month, Lisa, is a photographer and has so many great posts on the subject on her blog Expandng.com  One of her posts:  How to Quickly Catalog, Cull, and Edit Photos using Lightroom is a perfect follow up to after you have taken your family portraits.  If you are only using photoshop and have not heard or have not used Lightroom yet, I highly suggest taking a read.  While photoshop is really geared towards graphic design artists, Lightroom is really geared towards photographers.  Let Lisa know how you found her and you can ask her photography questions over Twitter: https://twitter.com/lisacng
*All photography (minus the sponsored photo) belongs to Bonnie Rose of Bonnie Rose Photography © 2007 – 2013 All Rights Reserved | www.bonnie-rose.co.uk

Guest Post: Avoid Being a ‘Wanna-Be’ Photographer

H o w   t o   A v o i d   b e i n g   a   ‘ W a n n a – b e ‘   P h o t o g r a p h e r  

892075_584954904679_1249954614_o
Hey, I’m Amanda, and I blog over at Living in Another Language. I love miss Bonnie Rose, and I’m constantly stalking her blog to see what new and exciting things she’s up to. Including her sweet photography skills.
Speaking of photography, is it just me, or is everyone out there claiming to be a photographer? —>CHEESIEST transition line EVER<—
If you think photography is in your blood, and all you see during big events are great picture opportunities, you are most likely considering becoming a photographer.
Due to the recent boom of picture snapping junkies (hey….I include myself in this category), the trick is to find something that makes you stand out in a crowd. What are your specialties-what do you like to shoot? Stick to what your passionate about. What you see, what interests you, what you envision in a shot DIRECTLY relates to what the final picture turns out to be.
I’m definitely not a professional. I spent the last 4 years going to photography classes, learning my ol’ Canon Rebel xsi like the back of my hand, reading photo tips, tricks, and tutorials online, until I couldn’t do anymore. Once my husband saw how passionate I was for photography he bought me my first real camera. A Canon 5D Mark II. I still drool whenever I see it’s name (granted now I’m using some of that saliva to drool over the Mark III). It was a late birthday/Christmas gift, and even after 7 months I STILL feel like I’ve barely tapped into it.
So how exactly do you go about becoming a ‘credible’ photographer and not just a ‘wanna-be’ (cause Lord knows we all hate that)? Fake it ’til you make it. Um wait. I seriously just gave that advice? No wait. Let me explain. Do your research. Study great photographers. WHY are their images so intriguing? Why will people pay thousands of dollars for a photo session with said photographer? Try to mimic the way they do things (OK this does NOT mean being a copycat. Mimic the camera angles, the lighting, the photo filters). See what you feel most comfortable with.
Also spend some time learning about post-photography editing. You may have scored the perfect shot, but even the most fantastic photo can be completely ruined by post-photography editing. I’ve pulled a few of my photos from throughout the years (mainly 2005-2009) that have been completely ruined by editing them wrong. Have a good laugh or head shake. My pain is your gain. Consider these the DONT’S of photo editing.
216605_503140017369_9369_n
1. First of all, this is a SUPER old picture from 2005. I had just gone on a trip to Peru, and didn’t necessarily like this photo because I looked a little tired. So I edited the CRAP out of it.  TIP: If you don’t like a picture, scrap it, or don’t TRY to make it better by editing. Odds are it’ll still look bad.  This photo is over-saturated, over-exposed, and my teeth are overly whitened (why, just WHY). Along with WHO KNOWS what else.
19551_513909165909_4356994_n
2. The vignette  look. I have plenty of prime examples of this, but 99.9% of them were too embarrassing to show. If you’re wanting to make it in the photography world, stay away from vignetting as much as possible! I honestly believe it makes the photos look a little tacky. I’ve seen some photographers do great things with it, but leave it to those who know how to use it. :) I should also note that there are lenses out there that have a natural vignette to them. I currently own a Canon 28-105mm, and the sucker vignettes like none other. I have to go into Camera Raw to get it out of there. Sometimes it works, but most of the time it does nothing for my photo. The photo above demonstrates the dreaded black corners, as well as the over-exposed, bright (I need some sunglasses) look.
249705_503451373409_5283_n
3. I suppose if you find yourself in an exposing ‘saloon girl’ dress, two guns in hand, and sitting pretty for a western photo shoot, you may expect your prints to come out with a sepia tone. After all, that is the old time look. However if you’re out with your girlfriends for a little masquerade party, you’re most likely wanting to keep it current. Maybe at the time I thought the sepia was classy. It just looks out of place…and rather…old. 
207736_503140446509_6530_n
4. Selective coloring is a downright NO. just no. I’m not sure what else should be said about it, but it’s not in right now. It’s a fad that went out of style in 2004 (Ironically the year this picture was taken).
19551_513740593729_4347876_n
5. Don’t change the colors of the photo too much. I understand I was making the picture look like I was really chillin’ with Obama…but seriously? The photo looks terrible. There is absolutely nothing wrong with a little photo filtering. Or even color tinting a black and white. But when you do ALL of it at the same time? Your photo looks something like this. It’s as if your editing program threw up all over the picture! Stay away my friends.
34149_516962287429_3611750_n
6. Ok, this isn’t an editing error, it’s a picture taking error. Why? Well…what’s the purpose of this photo? What’s the focus? What am I supposed to be drawn toward? Don’t take pictures just to take them. Have a reason…trust me, your camera, computer, and tired eyes (from filtering through the good pictures and bad pictures) will thank you.
Ok. Now on to the good part. After learning from my past mistakes, I have licked my wounds and started over. The remaining photos below are the result.
Here are a few of my favorite photos I’ve taken in the last few months, and an explanation why I chose to edit them the way I did.
IMG_3923
1. To be honest, I almost ditched this one. The exposure was all sorts of funky and I couldn’t get it to lighten the way I wanted without washing the details out. That’s when I decided to go the opposite way. Why not darken the photo and play on the natural highlighted parts from the sun? It didn’t take me very long to get it the way I wanted. I also applied a VSCO setting in RAW to get the faded yellowy effect.
964636_590892810069_236797519_o
2. I am all about experimenting with my camera and learning new things. I have about 5 hours to myself on Saturdays (the husband is out teaching), and I use some of that time practicing my love for photography. Unfortunately living in South Korea I don’t have many friends (aka photo subjects). I have loved the challenge to practice my skills on MYSELF! I recently did a tutorial on taking professional looking self-portraits here. 
I have this particular photo in both the black and white and color. I chose black in white due to the ‘mystery’ in the shot. It adds more of a timeless quailty to the photo and brings more focus to my face ( I was wearing a neon purple shirt which could be a little distracting).
466868_587718007399_227859327_o
3.I love this shot I took just down the road at Hakdong Beach. I love the way the sun is climbing down the mountain towards the beach. I love the old concrete dock. I love the wave breaking over the strange pebbles that overtake the beach. I didn’t have to do much to this photo: I increased the saturation and brought up the shadows a bit.703542_590600356149_105682454_o
4. To tell you the truth, I used a VSCO setting for this photo and did absolutely nothing else. If you haven’t played around with VSCO you’re missing out! When I first got it, I spent HOURS seeing what all the different settings did to my photos. I love how this setting not only added a warm color throughout the picture, but it added a soft fade which works really good with all the contrasting details, bringing the photo together. It also probably helped that the background of the Boseong green tea field was breathtakingly beautiful.
812647_578889050699_1851855605_o
5. This is yet another self-photograph inspired by the natural light that was shining through my window. I decided on the soft sepia look instead of straight-laced black and white because it brought a warmth and intrigue the black and white didn’t. You’ll notice I didn’t dig too deep into sepia (like the #3 DONT above), because I didn’t want this photo to scream ‘antique!’
IMG_3787
 6. This scenery at Seoraksan National Park, South Korea was breathtaking. I wanted to add this photo to the guest posting to show you the slight vignetting effect my lens has. I decided to leave it, because it somehow works with the photo, drawing you towards the center. For this photo I brought up the highlights, added some saturation, and a slight fade.
Well readers, thank you for sticking with me through my good times and bad (literally). If you’d like to see more of my recent work as well as discover what it’s like to live in South Korea as an expat, drop by my blog! I am constantly posting all sorts of weird things I discover on a daily basis, as well as any sort of domestic tips I’ve learned to make my life easier over here.
You can also check out my TwitterFacebook, and Bloglovin’! Please leave me a comment so I know you dropped by. :)
sig